脚本仅支持CentOS7,64位系统!!!请使用纯净的系统安装!!!请使用ROOT用户执行脚本!!!
qBittorrent for CentOS7一键安装脚本
作者主页:https://lala.im/4036.html
使用方法:
wget https://lala.im/static/script/qBittorrentCentOS7install.sh && chmod +x qBittorrentCentOS7install.sh
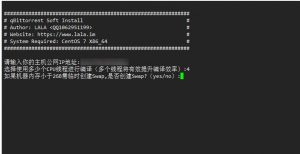
./qBittorrentCentOS7install.sh
因为编译libtorrent的时候需要用到大量的内存,小于2GB的机器可能会因为内存不足导致进程被杀掉,所以我在脚本内加了一个创建swap的功能。创建的swap文件保存在/var目录下,安装完成之后可以自己手动删除掉。(话说内存小于2GB还装个锤子QB啊,挂PT内存没4G起步,你不是在玩蛇吗???)

另外因为libtorrent编译需要比较长的时间,我加了一个设置编译时使用多个CPU线程的功能,根据你自己机器的CPU核心数来设置就行了,比如你是一个4核心的机器,在脚本内输入4,那么编译的速度会变快很多!
脚本会帮你安装如下软件:
qBittorrent4.1.1
libtorrent1.1.9(https://github.com/arvidn/libtorrent/releases/)
回显内容:
qBittorrentWEB地址:你的机器公网IP+端口8080
WEB账号:admin
WEB密码:adminadmin
管理命令:
systemctl start qbittorrent
systemctl stop qbittorrent
systemctl restart qbittorrent
脚本内容:
#!/bin/bash
PATH=/bin:/sbin:/usr/bin:/usr/sbin:/usr/local/bin:/usr/local/sbin:~/bin
export PATH
#=================================================================#
#   System Required: CentOS 7 X86_64                              #
#   Description: qBittorrent Soft Install                         #
#   Author: LALA <QQ1062951199>                                   #
#   Website: https://www.lala.im                                  #
#=================================================================#

clear
echo
echo "#############################################################"
echo "# qBittorrent Soft Install                                  #"
echo "# Author: LALA <QQ1062951199>                               #"
echo "# Website: https://www.lala.im                              #"
echo "# System Required: CentOS 7 X86_64                          #"
echo "#############################################################"
echo

# Color
red='\033[0;31m'
green='\033[0;32m'
yellow='\033[0;33m'
font="\033[0m"

# HostIP input
read -p "请输入你的主机公网IP地址:" HostIP

# CPUcore input
read -p "选择使用多少个CPU线程进行编译(多个线程将有效提升编译效率):" CPUcore

# Create Swap
read -p "如果机器内存小于2GB需临时创建Swap,是否创建Swap?(yes/no):" Choose
if [ $Choose = "yes" ];then
    dd if=/dev/zero of=/var/swap bs=1024 count=2097152
    mkswap /var/swap
    chmod 0600 /var/swap
    swapon /var/swap
fi
if [ $Choose = "no" ]
then
    echo -e "${yellow} 你选择不创建swap,脚本将继续进行下一步操作 ${font}"
fi

# Disable SELinux Function
disable_selinux(){
    if [ -s /etc/selinux/config ] && grep 'SELINUX=enforcing' /etc/selinux/config; then
        sed -i 's/SELINUX=enforcing/SELINUX=disabled/g' /etc/selinux/config
        setenforce 0
    fi
}
# Stop SElinux
disable_selinux

# Disable Firewalld
systemctl stop firewalld.service
systemctl disable firewalld.service

# Update System
yum -y update
if [ $? -eq 0 ];then
    echo -e "${green} 系统更新完成 ${font}"
else
    echo -e "${red} 系统更新失败 ${font}"
    exit 1
fi

# Install Required
cd ~
yum -y install wget
if [ $? -eq 0 ];then
    echo -e "${green} Wget安装成功 ${font}"
else
    echo -e "${red} Wget安装失败 ${font}"
    exit 1
fi
yum -y install git
if [ $? -eq 0 ];then
    echo -e "${green} Git安装成功 ${font}"
else
    echo -e "${red} Git安装失败 ${font}"
    exit 1
fi
yum -y install epel-release
if [ $? -eq 0 ];then
    echo -e "${green} EPEL源安装成功 ${font}"
else
    echo -e "${red} EPEL源安装失败 ${font}"
    exit 1
fi
yum -y groupinstall "Development Tools"
if [ $? -eq 0 ];then
    echo -e "${green} 开发工具包安装成功 ${font}"
else
    echo -e "${red} 开发工具包安装失败 ${font}"
    exit 1
fi

# Install qBittorrent Required
yum -y install gcc gcc-c++ qt-devel boost-devel openssl-devel qt5-qtbase-devel qt5-linguist
if [ $? -eq 0 ];then
    echo -e "${green} qBittorrent编译所需依赖安装成功 ${font}"
else
    echo -e "${red} qBittorrent编译所需依赖安装失败 ${font}"
    exit 1
fi

# Install libtorrent
cd ~
wget --no-check-certificate https://github.com/arvidn/libtorrent/releases/download/libtorrent-1_1_9/libtorrent-rasterbar-1.1.9.tar.gz
if [ $? -eq 0 ];then
    echo -e "${green} libtorrent软件包下载成功 ${font}"
else
    echo -e "${red} libtorrent软件包下载失败 ${font}"
    exit 1
fi
tar -zxf libtorrent-rasterbar-1.1.9.tar.gz
cd libtorrent-rasterbar-1.1.9
./configure --prefix=/usr CXXFLAGS=-std=c++11
make -j${CPUcore}
make install
if [ $? -eq 0 ];then
    echo -e "${green} libtorrent编译成功 ${font}"
else
    echo -e "${red} libtorrent编译失败 ${font}"
    exit 1
fi
ln -s /usr/lib/pkgconfig/libtorrent-rasterbar.pc /usr/lib64/pkgconfig/libtorrent-rasterbar.pc
ln -s /usr/lib/libtorrent-rasterbar.so.9 /usr/lib64/libtorrent-rasterbar.so.9
if [ $? -eq 0 ];then
    echo -e "${green} libtorrent软连接创建成功 ${font}"
else
    echo -e "${red} libtorrent软连接创建失败 ${font}"
    exit 1
fi

# Install qBittorrent
cd ~
wget --no-check-certificate https://github.com/qbittorrent/qBittorrent/archive/release-4.1.1.tar.gz
if [ $? -eq 0 ];then
    echo -e "${green} qBittorrent软件包下载成功 ${font}"
else
    echo -e "${red} qBittorrent软件包下载失败 ${font}"
    exit 1
fi
tar -xzvf release-4.1.1.tar.gz
cd qBittorrent-release-4.1.1
./configure --prefix=/usr --disable-gui CPPFLAGS=-I/usr/include/qt5 CXXFLAGS=-std=c++11
make -j${CPUcore}
make install
if [ $? -eq 0 ];then
    echo -e "${green} qBittorrent安装成功 ${font}"
else
    echo -e "${red} qBittorrent安装失败 ${font}"
    exit 1
fi

# Create Systemd File
touch /usr/lib/systemd/system/qbittorrent.service
cat > /usr/lib/systemd/system/qbittorrent.service <<EOF
[Unit]
Description=qbittorrent torrent server

[Service]
User=root
ExecStart=/usr/bin/qbittorrent-nox
Restart=on-abort

[Install]
WantedBy=multi-user.target
EOF

# Setting qBittorrent Boot Running
systemctl enable qbittorrent

# Start qBittorrent
systemctl start qbittorrent

echo
echo "#############################################################"
echo "# qBittorrent Installation Complete                         #"
echo "# Web Panel: http://${HostIP}:8080                          #"
echo "# Web Account: admin                                        #"
echo "# Web Password: adminadmin                                  #"
echo "#############################################################"
echo
qBittorrent/Deluge/rTorrent/Transmission/H5ai 多功能一键脚本
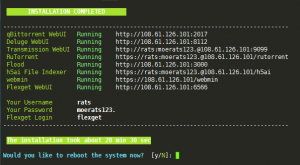
说明:博主今天逛了下Github,发现了一个大佬写的一个脚本,很强大,这里分享一下,脚本可安装qBittorrent、Deluge、rTorrent、Transmission、H5ai、Flood、Remote Desktop、wine & mono、Flexget、rclone、BBR及一些功能,如ffmpeg、mediainfo、mkvtoolnix、eac3to、bluray脚本、mktorrent,基本上该有的都有了,可能有些有人都没听说过,博主在后面会说明下。
运行脚本
Github地址:https://github.com/Aniverse/inexistence
系统要求:Ubuntu 16.04、18.04;Debian 8、9 ;Ubuntu 14.04、Debian 7可以选择用脚本升级系统,且尽量使用纯净系统,即刚重装的系统。
运行命令:
bash -c "$(wget --no-check-certificate -qO- https://github.com/Aniverse/inexistence/raw/master/inexistence.sh)"wget --no-check-certificate -qO inexistence.sh https://github.com/Aniverse/inexistence/raw/master/inexistence.sh
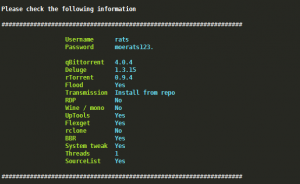
bash inexistence.shbash <(wget --no-check-certificate -qO- https://github.com/Aniverse/inexistence/raw/master/inexistence.sh)然后会出现以下选项:
##关于选项及说明请先看文章后面,然后再进行选择

#是否升级系统,本选项只在Ubuntu 14.04、Debian 7中出现
You are now running Ubuntu 14.04.5, which is not supported by this script

01) Upgrade to Ubuntu 16.04 (Default)
02) Upgrade to Ubuntu 18.04
03) Do NOT upgrade system and exit script
Would you like to upgrade your system? (Default 01):

#添加账号和密码
The script needs a username
This will be your primary user. It can be an existing user or a new user
Enter username: rats
Confirm that username is rats, [Y]es or [N]o? y

The script needs a password, it will be used for Unix and WebUI
The password must consist of characters and numbers and at least 8 chars,
or you can leave it blank to generate a random password
Enter the password: moerats
Enter the new password again: moerats

#改变系统源
Would you like to change sources list? [Y]es or [N]o: y
/etc/apt/sources.list will be replaced

01) Use all available threads (Default)
02) Use half of available threads
03) Use one thread
04) Use two threads
How many threads do you want to use when compiling? (Default 01):

#安装时是否添加虚拟内存,本选项只在2G以下的服务器中显示
Note that Your RAM is below 1926MB, memory may got exhausted when compiling
Would you like to use swap when compiling? [Y]es or [N]o:

#安装Deluge
01) Deluge 1.3.11
02) Deluge 1.3.12
03) Deluge 1.3.13
04) Deluge 1.3.14
05) Deluge 1.3.15
30) Select another version
40) Deluge 1.3.13 from repo
99) Do not install Deluge
Which version of Deluge do you want? (Default 05):

#安装qBittorrent
01) qBittorrent 3.3.7
02) qBittorrent 3.3.11
03) qBittorrent 3.3.14
04) qBittorrent 3.3.16
11) qBittorrent 4.0.2
12) qBittorrent 4.0.3
13) qBittorrent 4.0.4
14) qBittorrent 4.1.0
15) qBittorrent 4.1.1
30) Select another version
40) qBittorrent 3.3.7 from repo
99) Do not install qBittorrent
Which version of qBittorrent do you want? (Default 13):

#安装rTorrent,包括ruTorrent,nginx,ffmpeg 3.4.2,rar 5.5.0,h5ai
14) rTorrent 0.9.6 (feature-bind branch on Jun 6, 2018)
15) rTorrent 0.9.7 (with IPv6 support)
99) Do not install rTorrent
Note that Debian 9 and Ubuntu 18.04 is only supported by rTorrent 0.9.6 and later
Which version of rTorrent do you want? (Default 14):

#安装flood,rTorrent的一个面板
Would you like to install flood?  [Y]es or [N]o:

#安装Transmission
01) Transmission 2.77
02) Transmission 2.82
03) Transmission 2.84
04) Transmission 2.92
05) Transmission 2.93
06) Transmission 2.94
30) Select another version
40) Transmission 2.92 from repo
99) Do not install Transmission
Which version of Transmission do you want? (Default 40):

#安装VNC和X2Go
01) VNC  with xfce4
02) X2Go with xfce4
99) Do not install remote desktop
Would you like to install remote desktop? (Default 99):

#安装wine和mono
Would you like to install wine and mono? [Y]es or [N]o:

#安装MKVToolnix、mktorrent、eac3to、mediainfo、ffmpeg
MKVToolnix, mktorrent, eac3to, mediainfo, ffmpeg ...
Would you like to install the above additional softwares? [Y]es or [N]o:

#安装Flexget
Would you like to install Flexget? [Y]es or [N]o:

#安装rclone
Would you like to install rclone? [Y]es or [N]o:

#安装BBR
Your kernel is newer than 4.9, but BBR is not enabled
Would you like to use BBR?  [Y]es or [N]o:

#系统设置
Would you like to do some system tweaks? [Y]es or [N]o: 选项说明
本选项说明可能不会及时更新,不过以后脚本更新的话,大都差不多,请自行选择安装。
1、是否升级系统
如果你的系统是Debian 7或Ubuntu 14.04,你可以用本脚本来升级到Debian 8、9或Ubuntu 16.04、18.04,理论上整个升级过程应该是无交互的,应该不会碰到什么问题,升级完后会直接执行重启命令,重启完后你需要再次运行脚本来完成软件的安装
2、输入账号密码
你输入的账号密码会被用于各类软件以及SSH的登录验证,用户名需要以字母开头,长度4-16位;密码最好同时包含字母和数字,长度至少8位,请记住用户名和密码。
3、改变系统源
其实大多数情况下无需换源;但某些盒子默认的源可能有点问题,所以这里干脆做成默认都换源了。
4、安装时是否添加虚拟内存
一些内存不够大的VPS在编译安装时可能物理内存不足,使用swap可以解决这个问题,实测1GB内存的Vultr VPS安装 Flood不开启swap的话会失败,开启就没问题了,目前对于物理内存小于1926MB的都默认启用swap,如果内存大于这个值那么你根本就不会看到这个选项。
5、安装Deluge
默认选项为从源码安装1.3.15,此外还会安装一些实用的Deluge第三方插件。
AutoRemovePlus是自动删种插件,支持WebUI与GtkUI。
ltconfig是一个调整libtorrent-rasterbar参数的插件,在安装完后就启用了High Performance Seed模式。
Stats、TotalTraffic、Pieces、LabelPlus、YaRSS2、NoFolder 都只能在GUI下设置,WebUI下无法显示。
Stats和TotalTraffic、Pieces分别可以实现速度曲线和流量统计、区块统计。
LabelPlus是加强版的标签管理,支持自动根据Tracker对种子限速,刷Frds可用;也只有GUI可用。
YaRSS2是用于RSS的插件;NoFolder可以让Deluge在下载种子时不生成文件夹,辅种可用。
6、安装qBittorrent
Debian 8下安装qBittorrent 4.0目前还在测试阶段,隐藏选项21,是可以在WebUI下跳过校验的3.3.11版本,使用修改版客户端、跳过校验存在风险,后果自负。
7、安装rTorrent
这部分是调用修改的rtinst来安装的,默认选项为安装原版0.9.4。
安装rTorrent,ruTorrent,nginx,ffmpeg 3.4.2,rar 5.5.0,h5ai目录列表程序。
0.9.2-0.9.4支持IPv6用的是打好补丁的版本,属于修改版客户端。
0.9.6支持IPv6用的是feature-bind分支,原生支持IPv6(Debian 9 强制使用此版本)。
不修改SSH端口,FTP使用vsftpd,端口号21,监听IPv6。
设置了Deluge、qBittorrent、Transmission WebUI的反代。
ruTorrent版本为来自master分支的3.8版,此外还安装了如下的插件和主题。
club-QuickBox MaterialDesign第三方主题。
AutoDL-Irssi(原版rtinst自带)。
Filemanager插件可以在ruTorrent上管理文件、右键创建压缩包、生成mediainfo和截图。
ruTorrent Mobile插件可以优化ruTorrent在手机上的显示效果(不需要的话可以手动禁用插件)。
spectrogram插件可以在ruTorrent上获取音频文件的频谱。
Fileshare插件创建有时限、可自定义密码的文件分享链接。
Mediastream插件可以在线观看盒子的视频文件。
隐藏选项11-15 ,分别对应1.3.5-1.3.9版本,隐藏选项21,是可以跳过校验、全磁盘预分配的1.3.15版本,使用修改版客户端、跳过校验 存在风险,后果自负。
8、安装flood
选择不安装rTorrent的话这个选项不会出现,Flood是rTorrent的另一个WebUI,界面美观,加载速度快,不过功能上不如ruTorrent。
9、安装Transmission
Transmission默认选择从仓库里安装,节省时间(ban 2.93以前版本的站点也不是很多),此外还会安装美化版的WebUI,更方便易用。隐藏选项11和12,分别对应可以跳过校验、无文件打开数限制的2.92、2.93版本,使用修改版客户端、跳过校验存在风险,后果自负。
10、安装VNC和X2Go
远程桌面选项,默认不安装,远程桌面可以完成一些CLI下做不了或者CLI实现起来很麻烦的操作,比如BD-Remux,wine uTorrent,VNC目前在Debian下安装完后无法连接,建议Debian系统用X2Go或者另外想办法安装VNC。
11、安装wine和mono
这两个默认也是不安装的,wine可以实现在Linux上运行Windows程序,比如DVDFab、uTorrent,mono是一个跨平台的.NET运行环境,BDinfoCLI、Jackett、Sonarr等软件的运行都需要mono。
12、安装ffmpeg、MKVToolnix等
安装最新版本的ffmpeg、mediainfo、mkvtoolnix、eac3to、bluray脚本、mktorrent。
mediainfo用最新版是因为某些站发种填信息时有这方面的要求,比如HDBits。
mkvtoolnix主要是用于做BD-Remux。
ffmpeg对于大多数盒子用户来说主要是拿来做视频截图用,采用git的Static Builds。
eac3to需要wine来运行,做remux时用得上。
mktorrent由于1.1版的实际表现不是很理想,因此选择从系统源安装1.0版本。
BDinfoCLI已经自带了,需要mono来运行。
bluray其实也自带了。
13、安装Flexget
默认不安装;这里启用了daemon模式和WebUI,还预设了一些模板,仅供参考,因为配置文件里的passkey需要用户自己修改,所以这里也没有启用schedules或crontab,需要的话自己设置
14、安装rclone
默认不安装。安装好后自己输入rclone config进行配置。
15、安装BBR
如果你想安装魔改版BBR或锐速,请移步到:BBR+BBR魔改+Lotsever(锐速)一键脚本,脚本会检测你当前的内核版本,大于4.9是默认不安装新内核与BBR,高于4.9是默认直接启用BBR(不安装新内核)。
16、系统设置
默认启用,具体操作如下:
修改时区为UTC+8
语言编码设置为en.UTF-8
设置alias简化命令
提高系统文件打开数
修改screen设置
释放最大分区的保留空间
增加功能
以下是作者准备加入的功能,对该脚本有兴趣的可以随时关注Github地址。
#Password
修改SSH、Deluge、ruTorrent、Transmission、qBittorrent、Flexget密码的脚本

#Version
升级、降级Deluge、ruTorrent、Transmission、qBittorrent版本的脚本

#Box
考虑把各种客户端的安装每个都做成单独的脚本,然后在inexistence、banben中需要安装的时候直接调用,这个思路是从 QuickBox那边学到的,最后的命令大概这样子box install vnc、box purge qbittorrent。


评论
还没有任何评论,你来说两句吧!